
09 Oct How to Take Aesthetic Photos for Instagram: A Complete Guide
Instagram has become one of the most popular social media platforms, and one of its biggest appeals is the visual content. Aesthetic photos—those that are visually pleasing, cohesive, and stylish—can elevate your Instagram profile, attract followers, and even help you grow your personal brand. But taking aesthetic photos isn’t just about having an expensive camera or professional editing skills; it’s about knowing how to capture the right angles, colors, and vibes. In this guide, we’ll explore practical tips to help you take Instagram-worthy aesthetic photos.
1. Understand What Aesthetic Means
Before diving into photography techniques, it’s important to understand what “aesthetic” really means. Aesthetic photos are visually appealing and have a consistent style or mood. They often involve:
- Color harmony: Using complementary or soft color palettes.
- Composition: Arranging elements in a way that is balanced and pleasing to the eye.
- Lighting: Natural light is usually preferred for soft and flattering results.
- Mood: The overall feeling or vibe of the photo—happy, cozy, minimalist, or artistic.
Having a clear vision of your desired aesthetic will make it easier to take cohesive and attractive photos.
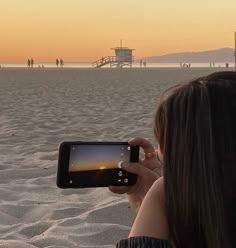
2. Use Natural Light
Lighting can make or break a photo. Natural light is often the best choice for aesthetic photos because it looks soft, flattering, and realistic. Here are some tips:
- Golden hour: Shoot during the hour after sunrise or before sunset for warm, dreamy lighting.
- Avoid harsh midday sun: It can create unflattering shadows and bright highlights.
- Window light: Position your subject near a window for soft, diffused lighting indoors.
- Cloudy days: Overcast skies act as a natural diffuser, creating evenly lit, soft photos.
Even with a smartphone camera, good lighting can dramatically improve the aesthetic quality of your photos.
3. Focus on Composition
Composition is how you arrange elements in your photo. Paying attention to composition helps create balance and makes your photos more engaging. Here are a few key techniques:
- Rule of thirds: Imagine a grid over your image and place important elements along the lines or at intersections.
- Leading lines: Use roads, pathways, or lines in architecture to guide the viewer’s eye.
- Symmetry and patterns: Symmetrical scenes or repeating patterns look very pleasing.
- Negative space: Don’t overcrowd the frame. Sometimes, empty space enhances your subject.
Experiment with different angles and perspectives—shoot from above, at eye level, or from a low angle to find what looks best.
4. Choose a Color Palette
Color plays a huge role in aesthetics. Instagram feeds with a cohesive color palette often look more professional and visually appealing. Tips for color coordination:
- Pick 2–3 main colors: Stick to a simple palette for your photos.
- Match your surroundings: If your outfit is pastel, try to shoot in matching or complementary environments.
- Avoid clashing colors: Too many bright or contrasting colors can distract the viewer.
- Editing consistency: Use similar filters or preset styles to maintain a cohesive look across your feed.
Even subtle adjustments, like boosting warmth or toning down saturation, can make your photos more consistent.
5. Use Props and Styling
Props add interest to photos and make them more relatable. They also help create your aesthetic vibe. For example:
- Coffee cups or books can give a cozy, lifestyle feel.
- Flowers or plants create a natural, calming vibe.
- Fashion accessories like hats, scarves, or jewelry add personality.
- Food and drinks can be styled to look delicious and photogenic.
When using props, avoid overcrowding the image. Each item should complement the subject, not distract from it.
6. Experiment with Angles and Perspectives
Most Instagram photos are taken at eye level, but changing your perspective can create more interest:
- Top-down shots: Great for flat lays of food, fashion, or art.
- Low-angle shots: Make objects or buildings look taller and more dramatic.
- Close-ups: Capture small details like textures, patterns, or intricate designs.
- Wide shots: Show the environment or context, adding depth to your feed.
Try multiple angles before choosing the final shot. Sometimes the most ordinary scene looks stunning from a different perspective.
7. Edit Thoughtfully
Editing is crucial for creating an aesthetic Instagram feed. However, subtlety is key—you don’t want to overdo it. Editing tips include:
- Brightness and contrast: Adjust to make your photo pop.
- Saturation and warmth: Enhance colors to match your aesthetic.
- Sharpening and clarity: Highlight details without making it look unnatural.
- Filters and presets: Choose a consistent filter or preset to maintain your feed’s style.
Apps like Lightroom, VSCO, Snapseed, or even Instagram’s own editing tools are excellent for beginners and advanced users alike.
8. Keep Your Feed Consistent
Aesthetic photos aren’t just about individual images—they’re also about how your feed looks as a whole. Consider:
- Theme: Minimalist, pastel, moody, bright, or vintage.
- Layout: Plan your grid so colors and images complement each other.
- Consistency: Avoid mixing too many styles; stick to a cohesive visual language.
Tools like Planoly, UNUM, or Preview can help you visualize your feed before posting.
9. Practice Mindful Photography
Finally, taking aesthetic photos is also about enjoying the process. Observe your surroundings, be creative, and don’t rush. Photography improves with practice, and over time, you’ll develop a natural eye for beauty and composition.
Remember, your unique perspective is what makes your photos stand out. Trends come and go, but authenticity resonates with people.
10. Common Mistakes to Avoid
Even beginners can take stunning photos if they avoid these mistakes:
- Ignoring lighting: Poor lighting can make even the most beautiful scenes look dull.
- Cluttered backgrounds: Too many elements distract from the subject.
- Over-editing: Filters that are too strong can look fake and unappealing.
- Copying others: While inspiration is good, copying someone else’s style doesn’t create originality.
- Neglecting composition: Random framing often looks unprofessional.
By being mindful of these pitfalls, your photos will look more polished and aesthetically pleasing.
FAQs About Taking Aesthetic Photos for Instagram
1. Do I need a professional camera to take aesthetic photos?
No, you don’t. Smartphones today have excellent cameras. The key is lighting, composition, and editing, which can all be achieved with a phone.
2. How do I choose a color palette for my Instagram feed?
Pick 2–3 main colors that reflect your personality or brand. Use matching environments, props, and editing to maintain consistency.
3. Can I take aesthetic photos indoors?
Absolutely! Use natural light from windows, soft lamps, and minimalistic backgrounds. Props and styling can make indoor photos look professional.
4. How often should I post aesthetic photos on Instagram?
Consistency is more important than frequency. Posting 3–5 times a week with high-quality, cohesive photos is better than daily low-quality posts.
5. What apps are best for editing Instagram photos?
Popular apps include Lightroom, VSCO, Snapseed, and Instagram’s built-in tools. These allow you to adjust brightness, color, contrast, and apply filters to maintain a consistent aesthetic.
Conclusion
Taking aesthetic photos for Instagram is a mix of creativity, practice, and attention to detail. By understanding lighting, composition, color harmony, props, angles, and editing, anyone can create visually appealing photos—even with a smartphone. Remember, the most important thing is to develop your unique style and enjoy the process. Over time, your Instagram feed will become a true reflection of your aesthetic vision, attracting followers who appreciate your creativity.
No Comments